fulfillmenttools & commercetools Connect – Integrating this Powerful Duo

Integrating multiple ecommerce systems can be a complex task, involving the seamless and reliable transfer of data and synchronization between different platforms. In the initial installment of this blog series, we introduced our commitment to open source, highlighting the fulfillmenttools connector for commercetools as one of our earliest open source initiatives.. Today, we’re taking a closer look at commercetools Connect and how you can use it to integrate the fulfillmenttools Next Generation Order Management System (OMS) into your ecommerce landscape. As an important partner to us, commercetools is a flexible commerce platform based on MACH principles that empowers businesses to build modern, scalable and customizable ecommerce solutions. Their product commercetools Composable Commerce provides components that deliver the flexibility businesses need to build and future-proof their digital commerce success.
Seamless Integration of commercetools and fulfillmenttools
commercetools Connect is a powerful integration framework with performant and reliable plug-and-play connectors. These connectors are powered, hosted and validated by commercetools, enabling businesses to easily enhance their composable commerce projects with additional functionality and components. With commercetools Connect, there is no need for dedicated hosting or runtime environments. Deployment of connectors can be done through the Connect API or the Merchant Center. This allows businesses to accelerate new features to market and enhance both the customer and merchant experience.
If you’re new to commercetools Connect, we recommend checking out this excellent blog post from commercetools that explains the advantages of this integration model. Additionally, you can find a comprehensive overview of the system interactions, demonstrating how the different components work together.
fulfillmenttools offers an application connector for the integration of your composable commerce project with the fulfillmenttools OMS. This app is a certified Public Connector available in the Connect marketplace. Using the fulfillmenttools connector simplifies the integration process and reduces development efforts as you can rely on tested and certified components. Joining the forces of fulfillmenttools OMS and commercetools Composable Commerce brings the power of your fulfillment network into your ecommerce processes.

The fulfillmenttools connector provides the following essential functionality:
- Capturing order events from commercetools to create new customer orders in the fulfillmenttools OMS (1).
- Capturing fulfillment process events from fulfillmenttools OMS when an order has been picked, packed, and handed over for shipping (2). This information is then used to update the commercetools order, ensuring that the fulfillment status is readily available in your composable commerce project.
- Capturing channel events from commercetools to automatically create and update fulfillment locations such as stores or warehouses in the fulfillmenttools OMS (3).
In this tutorial, we will guide you through the process of connecting your commercetools Composable Commerce project with fulfillmenttools OMS, enabling the seamless synchronization of order information between both systems. This integration eliminates the need for a complicated integration process, allowing you to start fulfilling orders with ease.
Installing the fulfillmenttools Connector
Prerequisites:
- You will need a fulfillmenttools account and API key. You can use your existing fulfillmenttools project account or request a free trial.
- If you don’t have an existing composable commerce project already, request your free trial.
Installing and configuring the fulfillmenttools connector for your project is quick and easy. Just follow these steps:
- Log in to commercetools Composable Commerce Merchant Center and switch to the project where you want to install the connector.
- If you’re using a commercetools trial project, import the sample data or set up your own products, customers, etc. as necessary. This step is necessary for the order synchronization example described in this tutorial.
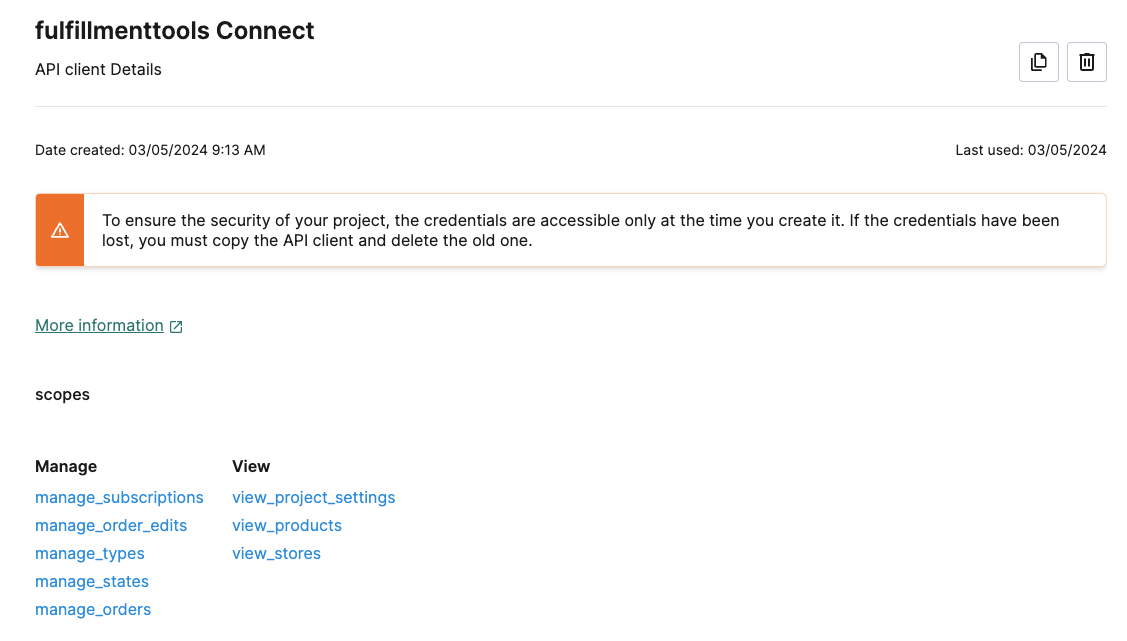
- Set up an API Client so that the app can interact with your project. Create a new API client following the documentation. Make sure to select the following permissions (scopes):
- Manage Orders
- Manage States
- Manage Subscriptions
- Manage Types
- View Products (all)
- View Products (published)
- View Project Settings
- View Stores
- Remember to securely save the credentials as you will need them in the next steps.
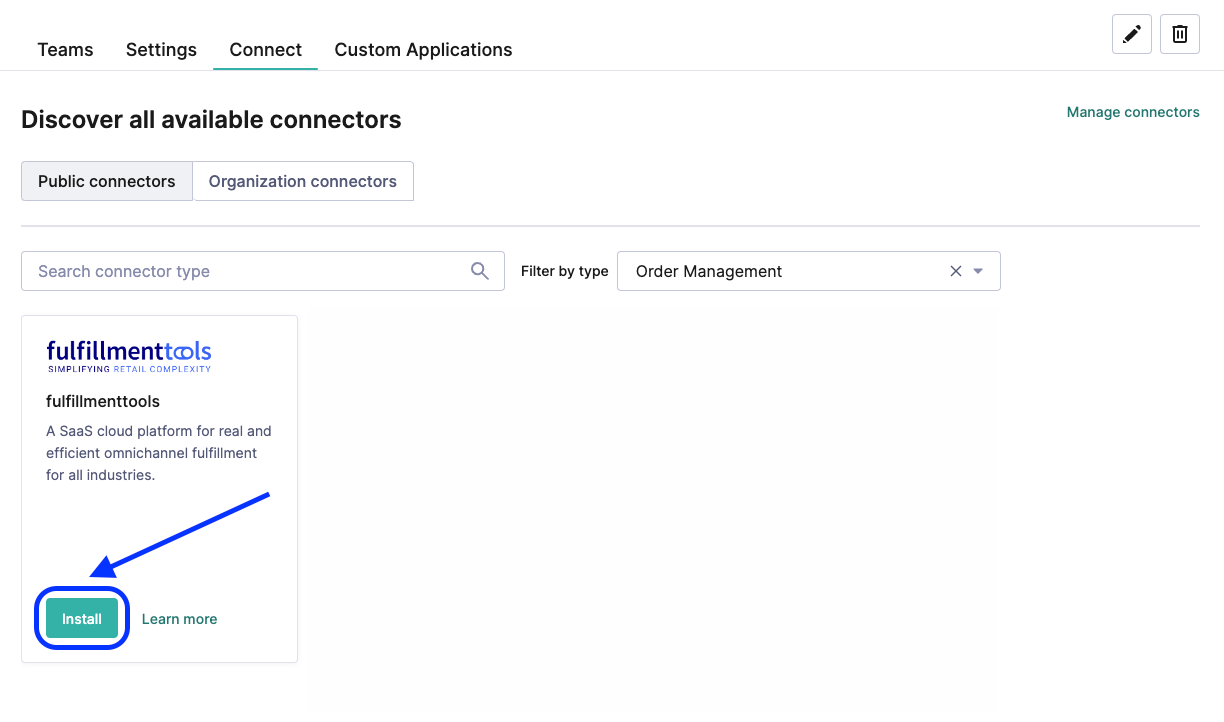
- From the project’s Home page, click on the “Check out commercetools Connect” to access the Connect marketplace.
- In the marketplace, choose the fulfillmenttools connector and click “Install”:
- In the first step, select the region and organization where you want to install the connector. Next, choose which projects you want to install it:

- In the second step you have to configure the connector. Note that the fulfillmenttools connector is technically two apps combined, so you have to configure them both. Don’t worry, the settings are the same for both apps. Fill in all the required input fields.

- The following information needs to be entered in the configuration section of both apps.
- From your composable commerce project:
-
- CTP_PROJECT_KEY, identifies your commercetools project
- CTP_REGION, e.g. europe-west1.gcp (see documentation on regions)
- CTP_CLIENT_ID, from the API client created above
- CTP_CLIENT_SECRET, from the API client created above
- CTP_SCOPE = view_project_settings:<your-project-id> view_products:<your-project-id>
view_stores:<your-project-id> manage_subscriptions:<your-project-id> manage_types:<your-project-id> manage_states:<your-project-id> manage_orders:<your-project-id>
2. From your fulfillmenttools project:
-
- FFT_PROJECT_ID, identifies your fulfillmenttools project
- FFT_API_KEY, the API key
- FFT_API_USER, your API user
- FFT_API_PASSWORD, your API password
3. JSON web tokens are used for authentication between fulfillmenttools OMS and the connector. Choose a strong password (at least 32 characters long) and values for audience, issuer, and subject claims, e.g.
-
- JWT_SECRET = <your-very-secure-password>
- JWT_ISSUER = urn:ocff:fulfillmenttools
- JWT_AUDIENCE = urn:ocff:connect
- JWT_SUBJECT = urn:ocff:commercetools
- Click the “Install” button, sit back and relax.the deployment will take a little while. The installation status will be displayed in the “Manage connectors” page.

That’s it! Once the connector is deployed, you can start using it! If you’re interested in the low level details, feel free to inspect the app logs.
| Note: This tutorial describes the deployment using the Merchant Center. However, it is also possible to deploy the connector into your project using the commercetools Connect API for integration into your existing processes. If you have any questions or need assistance, please don’t hesitate to reach out. |
Channel Synchronization
In the next step, we are going to create a Channel in your commercetools project. The connector will automatically create a counterpart in fulfillmenttools OMS, which is called a Facility. Facilities represent fulfillment locations such as stores or warehouses, and the OMS will distribute incoming orders to the best matching facility. Therefore, they play a crucial role in your fulfillment network configuration.
Ensure that the channel you created has the “Inventory Supply” role assigned to it. The fulfillmenttools connector will only synchronize channels with this role. Channels with other roles are ignored by the current version of the connector. Additionally, make sure to provide an address for the channel, as facilities in fulfillmenttools require an address to be defined.

Once you have saved the new channel, the fulfillmenttools connector will automatically get notified and create a new facility in your fulfillmenttools project. If you update the channel, e.g. change the name or the address, this will also trigger a direct update of the related facility.
Note: This synchronization process only works from commercetools towards fulfillmenttools. So if you decide to make direct updates to the facility in fulfillmenttools, those changes will not be reflected in the commercetools channel.

Order Synchronization
In the final part of this tutorial, we will place an Order in your commercetools project. The connector utilizes subscriptions to receive notifications when the OrderState of an order changes to “Confirmed”. At this state, the order information is retrieved, and a new order is created in the fulfillmenttools platform.
To set up your project for Ship-from-Store orders, follow these steps:
- If you haven’t already done so, create and configure your fulfillmenttools project with the carriers you wish to use. This tutorial uses DHL (key = DHL_V2) as an example, but you can use a different carrier depending on your requirements.

- In your composable commerce project, either create a new Shipping method or select an existing one. Make sure to note down the key of the shipping method, as it will be needed in the following steps.

- Create Custom Object for the service configuration of the fulfillmenttools connector. This configuration object allows you to fine-tune the connector settings to ensure flexibility in your commercetools project.
Note: You need to use the HTTP API to create the Custom Object since there is no UI for this operation available in the Merchant Center. Here’s an example how to do it using curl:

- In the “shippingMethodMapping”, ensure that the key (“standard-delivery” in our example) matches the key you have selected for the shipping method. The “carriers” list must contain the carrier key from the available carriers in your fulfillmenttools project.
- Finally, we’re going to create an order in the Merchant Center: Enter the order details (store, currency), customer information, and add items to the cart. Select the shipping method you have configured in the previous step. Review your data and place the order. Of course you can also create an order from a cart using the commercetools HTTP API.
- Update the order status from “Open” to “Confirmed”. Again, this can be done in the Merchant Center or using the commercetools API.

- As the connector is subscribed to OrderState changes, it will now get notified by the commercetools platform and process the new order: Read order details, map it into the correct format and place a new order with the fulfillmenttools API.
- Head over to the fulfillmenttools Back Office and navigate to the Network view. From the Order overview, verify that your order is displayed and has the correct carrier assigned.

Congratulations! Your composable commerce project and your fulfillmenttools OMS are now configured and ready to process Ship-from-Store orders seamlessly. You can continue placing more orders, creating additional channels, and explore the possibilities of omnichannel fulfillment without the need for coding.
Summary: Deploying and Configuring the fulfillmenttools Connector
In this tutorial, we successfully deployed the fulfillmenttools connector into your commercetools Composable Commerce project. We created a channel, placed an order, and verified that information is effectively synchronized with fulfillmenttools OMS.
In the next episode of this blog series, we will explore how to set up your project for Click&Collect and Click&Reserve orders. Additionally, we will explain how the connector utilizes custom fields to synchronize information from the fulfillment process back to the commercetools order. Stay tuned for more exciting updates!
The Power of commercetools Connect
The current version of the fulfillmenttools connector effectively synchronizes orders and channels, but we have more plans in store. Our roadmap includes expanding functionality for order cancellation, order tags, line item states, and product or inventory synchronization. We value your input and would love to hear your thoughts on which features are most important to you. Please get in touch with us using the contact form below.
Good to know: The fulfillmenttools connector is open source and available on GitHub. We invite you to contribute to the project and help us make it even better. You could also leverage the source as a blueprint to build your own connector. Let us know about your upcoming projects with commercetools and fulfillmenttools.
The power of commercetools Connect lies in its ability to simplify and streamline the integration of ecommerce systems. By leveraging this powerful framework and the certified fulfillmenttools connector, businesses can achieve seamless data exchange, optimize operations, and enhance the overall ecommerce experience.
We hope this blog post has shed light on the functionality and configuration of our commercetools connector. Stay tuned for more insightful posts in our series on omnichannel fulfillment, retail technology and trends. Don’t forget to subscribe to our newsletter for regular updates.
If you have any questions or would like to share your thoughts on this topic, please leave a comment below. We would love to hear from you.